The Prolific CLI
Jun 28, 2024 · 6 min readThis post is going to be an introduction to the Prolific CLI for data collectors/researchers.
So Prolific have this to say on their website:
- Easily find vetted research participants and AI taskers at scale.
- An unrivalled participant pool.
- Data quality you can depend on.
OK, so you want to collect some data to train your AI model (I mean, who doesn’t nowadays?), then Prolific is the place to start. The CLI is aimed at:
- Software engineers working for companies that integrate with Prolific.
- Early integrators who want to scale with Prolific, but haven’t developed against the API yet.
- Power users who like to automate their workload as much as possible.
The rest of this post assumes you know about Prolific, and how it works.
The project
The project is hosted on GitHub and provides 3 simple ways to run the application. Follow the README for your preferred installation method. This post is now going to assume you have it running in a manner you prefer.
As per the README, you will need to generate your API token via the web application. Once you have the token, go ahead and define your PROLIFIC_TOKEN environment variable. Once that is done, let’s run:
❯ prolific whoami
Ben Selby
ID:                xxxxxxxxx
Email:             [email protected]
This will prove that your connection and installation is working fine.
Creating a study
Let’s go ahead and create a study. We are going to write a JSON document that defines our study. You can checkout the API docs to understand what the fields are, and which to define. This is my study. I’m going to collect some views on UK Politics, and use an application I’ve built myself and hosted on Netlify (The site is not live now). Prolific has a marketplace that could help you decide which tool to use.
{
  "name": "Political views in the UK",
  "internal_name": "UK Politics June 2024",
  "description": "This study aims to understand the political views of the public",
  "external_study_url": "https://bms-uk-pols.netlify.app/study/?id=xxxx",
  "prolific_id_option": "question",
  "completion_code": "ABC123",
  "completion_codes": [
    {
      "code": "ABC123",
      "code_type": "COMPLETED",
      "actions": [
        {
          "action": "AUTOMATICALLY_APPROVE"
        }
      ]
    }
  ],
  "total_available_places": 2000,
  "estimated_completion_time": 5,
  "reward": 100,
  "device_compatibility": ["desktop"],
  "peripheral_requirements": [],
  "filters": [
    {
      "filter_id": "current-country-of-residence",
      "selected_values": ["0"]
    }
  ],
  "submissions_config": {
    "max_submissions_per_participant": 1,
    "max_concurrent_submissions": -1
  }
}
I’m going to save the JSON above to /tmp/uk-pol-june-2024.json. We can now run the create command:
❯ prolific study create -t /tmp/uk-pol-june-2024.json
Political views in the UK
This study aims to understand the political views of the public

ID:                        66802cd4681e8e9e1eaa28a0
Status:                    UNPUBLISHED
Type:                      SINGLE
Total cost:                £2200.00
Reward:                    £1.00
Hourly rate:               £12.00
Estimated completion time: 5
Maximum allowed time:      19
Study URL:                 https://bms-uk-pols.netlify.app/study/?id=xxxx
Places taken:              0
Available places:          2000

---

Submissions configuration
Max submissions per participant: 1
Max concurrent submissions:      -1

---

Filters

current-country-of-residence
- 0

---

View study in the application: https://app.prolific.com/researcher/studies/668029f3681e8e9e1eaa287d
Once created, the study will be displayed on your screen. It also displays a link back to the web application if you want to view it there. If you want to create and publish at the same time, you can use the -p flag on the create above.
With a little bit of bash, you can start to see how we could scale interactions with Prolific, just by using the CLI. Checkout the script below which will create and publish all the studies defined. Nifty.
#!/usr/bin/env bash

STUDIES=(
  /tmp/prolific/ai-ethics.json
  /tmp/prolific/llm-train-2.json
  /tmp/prolific/llm-train-3.json
  /tmp/prolific/image-categorisation-1.json
)

for study in "${STUDIES[@]}"; do
  echo "Creating study for ${study}"
  if prolific study create -t "${study}" -p -s ; then
    echo " Created"
  else
    echo " Error"
  fi
done
List all your studies
To list all of your studies created on the Prolific Platform, you can run the prolific study list command. This comes with a variety of methods to see the data:
- Interactive (Default) - You will get a searchable view of the data. This can become very useful when you’re working with lots of data, and have hundreds or maybe thousands of studies in your project.
- Non-interactive - With the
-nflag you will get a list of studies in your terminal, where you can use paging options to page through the data. - CSV - With the
-csvflag you can decide which fields to render in your terminal. You can do this by using the-foption. This is handy if you want to export the data.
Let’s take a closer look at the interactive view for studies.
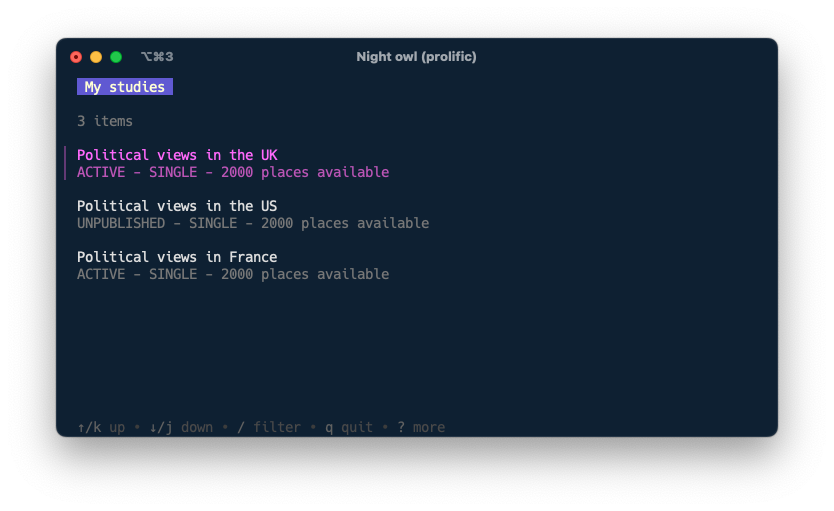
You can see we have three studies: two active, and one in draft. Let’s now try to filter this. As per the instructions at the bottom of the window, let’s use / to start filtering. Let’s search for France.
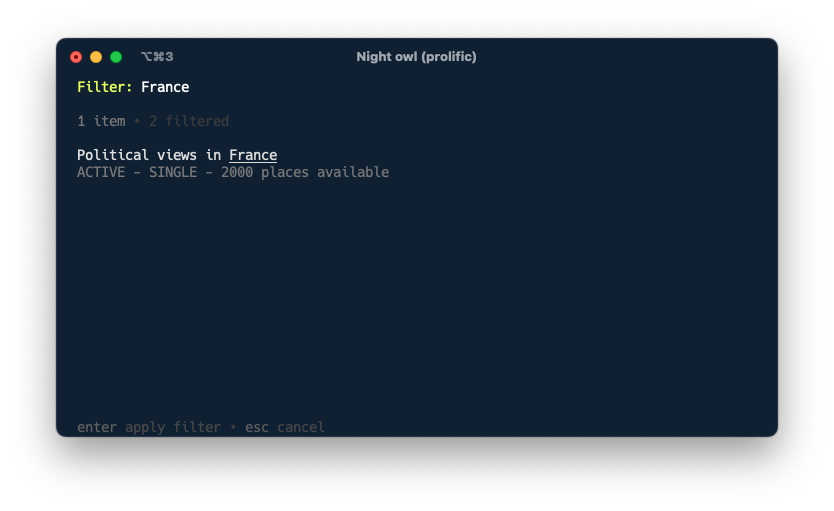
Now we have selected the study we want to view, let’s press enter to see the details.
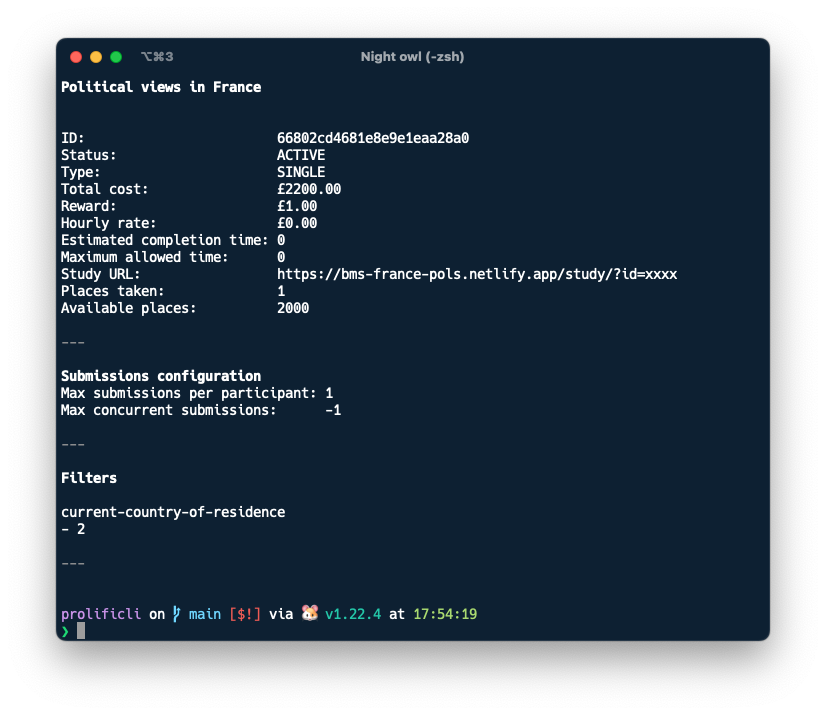
If you know the study ID, you can simply run prolific study view 66802cd4681e8e9e1eaa28a0 to get the same data.
Let’s list the studies we have, but only show the total cost for each study.
❯ prolific study list -n -f TotalCost
TotalCost
219999
220000
220000
Handy if we want to tot up how much we have spent.
❯ prolific study list -n -f TotalCost | grep -Eo '[0-9]+' | awk '{sum+=$1} END {printf "£%.2f\n", sum/100}'
£6599.99
Submission data
OK, so your studies are active, and participants are answering your questions or training your model. Now it’s time to view the submissions.
Let’s list out the submissions we have in non-interactive mode.
❯ prolific submission list -s 66802cd4681e8e9e1eaa28a0
ParticipantID            StartedAt                         TimeTaken StudyCode Status
667fe40be716f92cab75e52d 2024-06-29 15:48:45.535 +0000 UTC 19        ABC123    AWAITING REVIEW
667fe414e716f92cab75e606 2024-06-29 15:48:45.535 +0000 UTC 29        ABC123    AWAITING REVIEW
667fe413e716f92cab75e5f2 2024-06-29 15:48:45.535 +0000 UTC 45        ABC123    AWAITING REVIEW

Showing 3 records of 3
As with all the list views in the CLI, you can use the flags -o and -l to offset and limit, respectively. So we can page the information:
❯ prolific submission list -s 66802cd4681e8e9e1eaa28a0 -o 1 -l 1
ParticipantID            StartedAt                         TimeTaken StudyCode Status
667fe414e716f92cab75e606 2024-06-29 15:48:45.535 +0000 UTC 29        ABC123    AWAITING REVIEW

Showing 1 record of 3
This may help when dealing with that quantity of data. Lastly, let’s get a CSV file, and render specific fields.
❯ prolific submission list -c -s 66802cd4681e8e9e1eaa28a0 -f ParticipantID,Status,Reward
ParticipantID,Status,Reward,
667fe40be716f92cab75e52d,AWAITING REVIEW,10000,
667fe414e716f92cab75e606,AWAITING REVIEW,10000,
667fe413e716f92cab75e5f2,AWAITING REVIEW,10000,
You can use the --help option on any command to get further details about what you can do.
Summary
There are many other commands in the application, I recommend having a play around with it.
Other main features include:
- Ability to get your user account details.
- Ability to list your webhook subscriptions, and events Prolific has sent to it.
- Ability to send and retrieve messages.
- Ability to list and view your filter sets
- Ability to list and view your participant groups
I hope you enjoy using the Prolific CLI. If you have any feedback or requests, please raise an issue in GitHub. Thank you.